Installing Wowonder SpamShield addon by ScriptsTribe
Welcome to the SpamShield Installation Tutorial, your comprehensive guide to enhancing your website's email verification and spam prevention capabilities. SpamShield is a robust add-on designed specifically for WoWonder, empowering your platform with the ability to:
Database Blocklist for domains and domain extension
The SpamShield system offers robust protection for your platform by implementing advanced email validation and security measures. Here's what it does:
-
Block Spam Domains and Disposable Email Addresses: Ensure that only legitimate emails are allowed by cross-referencing against a comprehensive blacklist of spam domains and disposable email
addresses.providers. -
Prevent Unwanted Email Extensions: Restrict the use of
unwantedspecific emailextensions.extensions, such as.xyz,.shop, or others that are commonly associated with spam activity. ProvideseamlessSeamless Email Validation: Leverage advanced logic to validate email
validationaddresseswithinadvancedreal-time,logic.ensuring authenticity and reducing fake or malicious registrations.EnhancesecurityBlacklist
withDatabase: Utilize ablacklistpreloaded database of known spamsources.sources to proactively block them, keeping your user base secure and clean.
Honeypot Protection
The honeypot technique is a hidden form field added to your registration form. Bots attempting to fill this hidden field are instantly detected and blocked, preventing automated spam submissions.
Submission Delay
An anti-spam submission delay is integrated to prevent rapid form submissions often associated with bots. This simple yet effective technique ensures a more secure and controlled registration process.
Together, these features fortify your platform against spam, enhancing user security and maintaining the integrity of your community.
This tutorial will walk you through the installation process step-by-step, from preparing your environment to configuring the plugin. Whether you are a seasoned developer or a beginner, this guide ensures a smooth installation experience.
Let’s get started and make your platform more secure with SpamShield!
Step 1: Upload the files.
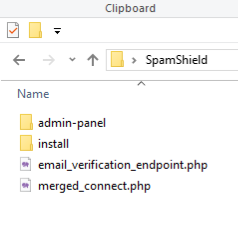
Download and upload the files to your wowonder root directory as shown in the picture.
Step 2: Run the installation script
Visit yoursite.com/install/install-spamshield.php
click the Confirm & Install blue button, when you see the green message, you are done. it should say
Installation completed successfully.
Step 3: Add the admin-panel pages (Please backup any file that you edit)
Now you must open and edit /admin-panel/autoload.php
now Look for
$pages = array(
    'general-settings',
after that add
	//SpamShield Start
	'add-spam-domain',
	'edit-spam-domain',
	'delete-spam-domain',
	'add-spam-extension',
	'edit-spam-extension',
	'delete-spam-extension',
	//SpamShield End
Look for (Around line 842)
<a href="#">
                            <span class="nav-link-icon">
                                <i class="material-icons">view_agenda</i>
                            </span>
                            <span>Manage Features</span>
                        </a>
After that add
						  <!-- ./ SpamShield Start -->
 <a href="#"><span class="nav-link-icon"><i class="material-icons">security</i></span>
 <span>SpamShield Settings</span></a>
<?php if ($is_admin || ($is_moderoter && $wo['user']['permission']['site-settings'] == 1)) { ?>
<ul class="ml-menu">
<li><a <?php echo ($page == 'add-spam-domain') ? 'class="active"' : ''; ?> href="<?php echo Wo_LoadAdminLinkSettings('add-spam-domain'); ?>" data-ajax="?path=add-spam-domain">Add Spam Domain</a></li>

	<li><a <?php echo ($page == 'add-spam-extension') ? 'class="active"' : ''; ?> href="<?php echo Wo_LoadAdminLinkSettings('add-spam-extension'); ?>" data-ajax="?path=add-spam-extension">Add Spam Extension</a></li>
 <?php } ?></ul>
 <!-- ./ SpamShield End -->
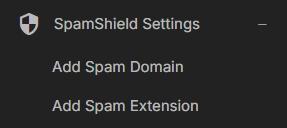
If you did everything correctly you should see this menu under the settings menu.
If you uploaded the files correctly you should not be able to add you settings.
Step 4: Now let's edit the themes files
I will start with wondertag because it is what I am using now.
in your wondertag themes/wondertag/layout/welcome/register.phtml
Look for
<?php $fields = Wo_GetWelcomeFileds(); ?>
<?php if (Wo_IsMobile() == false) { ?>
After that add
<? if (!empty($_POST['honeypot_field'])) {
    die("Bot detected.");
} ?>
This code detects and blocks bots by checking if a hidden form field (honeypot_field) has been filled. If it has, the script assumes it's a bot and stops execution with the message "Bot detected."
Look for Wondertag
	<label class="tag_field">
						<input name="email" type="email" autocomplete="off" placeholder=" " required>
						<span><?php echo $wo['lang']['email_address']?></span>
					</label>
Look for wowonder theme
<div class="wow_form_fields">
					<label for="email"><?php echo $wo['lang']['email_address']?></label>
					<input id="email" name="email" type="email" />
				</div>
Look for Sunshine theme
	<label class="tag_field">
						<input name="email" type="email" autocomplete="off" placeholder=" " required>
						<span><?php echo $wo['lang']['email_address']?></span>
					</label>
And replace with For wondertag
<label class="tag_field">
    <input name="email" type="email" id="email" autocomplete="off" placeholder=" " required>
    <span><?php echo $wo['lang']['email_address'] ?></span>
    <button class="btn btn-main btn-mat tag_wel_btn" type="button" onclick="verifyEmail()">Verify Email</button>
</label>
<div id="email-verification-status" style="color: red; font-size: 14px; margin-top: 5px;"></div>
And replace with for wowonder and sunshine
<div class="wow_form_fields">
<label for="email"><?php echo $wo['lang']['email_address']?></label>
<input name="email" type="email" id="email" autocomplete="off" placeholder=" " required>
<button class="btn btn-main btn-mat add_wow_loader" type="button" onclick="verifyEmail()">Verify Email</button>
</div>
<div id="email-verification-status" style="color: red; font-size: 14px; margin-top: 5px;"></div>
In any theme look for
<span><?php echo $wo['lang']['confirm_password']?></span>
					</label>
and add the honeypot field
<input type="text" name="honeypot_field" style="display: none;" />Now go all the way down to the bottom of the page and right before the closing script tag
</script>Add this code
/*AntiSpam Shield Start*/
/*Add Delay antispam*/
$(function() {
    $('#register').submit(function(event) {
        if (working) {
            event.preventDefault();
            alert("<?php echo $wo['lang']['SpamShield_Please_wait_a_moment']; ?>");

            return false;
        }
        setTimeout(function() {
            working = true;
        }, 2000); // Add a delay of 2 seconds
    });
});


let emailValidated = false; // Track email validation status

function verifyEmail() {
    var email = document.getElementById('email').value;
    if (!email) {
        document.getElementById('email-verification-status').textContent = "<?php echo $wo['lang']['SpamShield_Please_enter_an_email_address']; ?>";
        document.getElementById('email-verification-status').style.color = "red";
        disableSubmitButton();
        return;
    }

    $.ajax({
        url: '<?php echo $wo["config"]["site_url"]; ?>/email_verification_endpoint.php', // Endpoint URL
        method: 'POST',
        data: { email: email },
        success: function(response) {
            if (response.valid) {
                emailValidated = true; // Mark as validated
                document.getElementById('email-verification-status').textContent = "<?php echo $wo['lang']['SpamShield_Email_is_valid']; ?>";
                document.getElementById('email-verification-status').style.color = "green";
                enableSubmitButton();
            } else {
                emailValidated = false; // Mark as invalid
                document.getElementById('email-verification-status').textContent = response.message || "<?php echo $wo['lang']['SpamShield_invalid_email_address']; ?>";
                document.getElementById('email-verification-status').style.color = "red";
                disableSubmitButton();
            }
        },
        error: function() {
            emailValidated = false; // Mark as invalid
            document.getElementById('email-verification-status').textContent = "<?php echo $wo['lang']['SpamShield_email_verification_failed']; ?>";
            document.getElementById('email-verification-status').style.color = "red";
            disableSubmitButton();
        }
    });
}

function enableSubmitButton() {
    document.getElementById('sign_submit').disabled = false;
}

function disableSubmitButton() {
    document.getElementById('sign_submit').disabled = true;
}

// Prevent form submission if email is not validated
$('#register').submit(function(event) {
    if (!emailValidated) {
        event.preventDefault();
        alert("<?php echo $wo['lang']['SpamShield_validate_email_first']; ?>");
        return false;
    }
});
/*AntiSpam Shield End*/
Now Start adding you domains and domain extensions that you wish to block, It will be added to the database.
Enjoy and spammer free wowonder
If you love this addon leave me a cookie, a review and spread the word.


